You’re probably thinking: Four steps? That’s so high maintenance or how do you have enough time to get ready in the morning? Well you’ll be shocked to hear that in dire situations (such as waking up an hour before your shift) i can do a full face in 20 minutes. Right enough of me, let’s get to the brows.
Step One – Prime
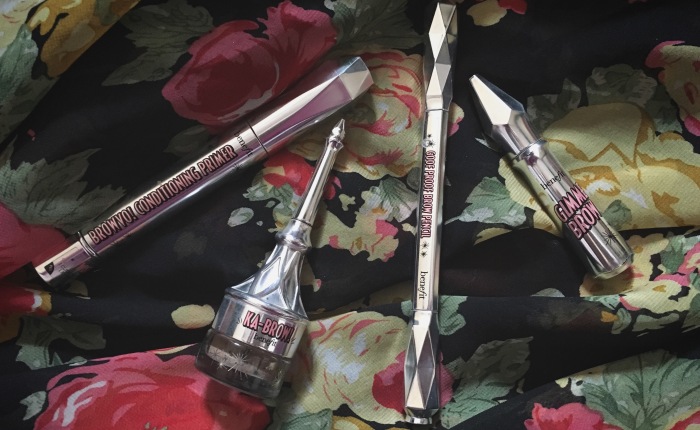
I begin by using the Benefit BROWVO Conditioning primer to prime my eyebrows for product and to comb them into shape with the brush-like applicator. The gel holds the individual eyebrow hairs in place while hydrating both the hairs and the surrounding skin. The finish is a gentle hold rather than a stiff finish created by such products as wax. (Which I actually used to use on mine. Never again!)
I also use this primer as a moisturizer in my pre-bed routine as it is believed to stimulate hair growth. I can neither confirm or deny this rumor… It just so happens that over the course of using the product I did develop thicker and more healthy looking brows. Whether that was down to the product, hormones or an eyebrow plucking ban though i have no idea. Maybe all of the above!
Step Two – Building shape
Now i wont lie this step is he one that takes the most time until you get the hang of it and you can wiz through it! I use the Benefit KA-BROW dip brow formula to build the shape of my brows and fill them in. For those of you wondering what the hell it is in that cute little bottle above, have you heard of the Anastasia Beverly Hills dip brow? It’s essentially Benefit’s version of that. The formula glides on and is super creamy and blendable. It even comes with its own brush in the handle which is adorable! One pot of KA-BROW has lasted be eight months so far and I still havent finished it completely! Talk about getting your money’s worth ey!
First I line the underneath of the brow, defining the arch and trailing off at the tail. Second, i do the same to the top of my brow. I try to make soft fluid stokes so there’s no harsh lines as these can make the brow look crooked and unfleeky. Next is time to fill in the main bulk of the brow. Remember to colour inside the lines! Last is the inner corner where my eyebrows are very sparse. we want this area to be the lightest and softest part of the brow. With any excess product on my brush (you really don’t need a lot for this part) I’ll brush upwards and blend blend blend. the goal is to get a very light faded colour on here as later i’ll go in and add fake eyebrow hairs with a pencil.
Step Three – Building Colour
Using the Benefit GOOF PROOF Eyebrow pencil I go over the tail of my brows in a slightly darker shade to my KA-BROW. My KA-BROW is a shade 3 and GOOF PROOF is shade 4. With this i like to create an almost ombre affect to get those insta-worthy brows. Once the tail and the arch are a shade 4 brow i blend blend blend to make sure there’s no harsh lines and the colours fade into each other as opposed to blocks of colour side by side.
Lastly I’ll use my pencil to create soft upward strokes in the inner corner of my brow to mimic eyebrow hairs. Again we want this to be the lightest part of the brow so they need to be sofffttttt strokes. A top tip I do if ive messed up and pressed too hard or i don’t think its blended enough is to literally just smudge it with my finger until its blended.
Step Four – Brush Brush Brush
Finally i use my Benefit GIMMI BROW formula which is what i call a mascara for your eyebrows. It adds that little bit of colour to your eyebrow hairs to make them stand out against the fake brow you’ve spent ever so long perfecting but the goal is to show that there are ACTUALLY REAL HAIRS IN THERE. The main aspect i use this product for is the inner corner of my brows, I’ll use it on the few hairs in that patchy area so they stand out in front of the fake ones I’ve previously drawn in.
And that is ladies and gents, not rocket science. Just a hell of a lot of practice and some kick-ass products. Here’s a picture of the final product.


Thanks for sharing! I’m trying so much to make my eyebrows look good but they always end up looking caked and like I’ve used crayons 😦 I wish I could do my eyebrows like yours.
❤❤❤❤
LikeLike
Aw no! What products do you use?? They might be the reason you’re not happy with them! They don’t have to be expensive either, i used to use a £2 eyebrow set from ebay for years haha
❤❤❤❤
LikeLiked by 1 person
I’ve tried so many different brands ~ Max Factor, Isadora, Maybelline etc. They are horrible! I even tried H&Ms and that one was tbh better than those but still. I could just take a box of crayons and apply on my face 😦
I can’t order from Ebay! I have tried so many times but no 😦
❤❤❤❤
LikeLike
Oh bless you! Go on boots and search for benefit, they have a video of how to solve your brow dilemma. So you can shop brow products suited for sparse brows for example. Have a little looksie and see if you like the look of any of the products 😁 I sound like I bloody work there 😂😂 I don’t 😅 ❤❤❤❤
LikeLiked by 1 person
Haha I was just about to comment “do you work there??” 😂 i will! Thank you ❤❤❤
LikeLike
I reckon I should work there with how much I promote them 😂❤❤❤
LikeLiked by 1 person
Haha contact them!!! 😂❤❤
LikeLike
You should definitely do a tutorial on how to do that eyeshadow/makeup too!
LikeLike
When a get a tad more confident I might be tempted to post video tutorials 😬😬😬
LikeLiked by 1 person
girl I will be following
LikeLike
Eeeek thank you so much! Can’t wait to post more I’ve had such positive responses
LikeLiked by 1 person
❤ ❤
LikeLike
Your eyeshadow looks really nice!
LikeLike
Thank you sweet ☺️
LikeLike
Benefit 🙌🏻🙌🏻🙌🏻 (obsessed a little)
LikeLike
Haha me too!
LikeLiked by 1 person
I love this post! I love doing make up and eye brows are the most important part to me. I’ve never used those products but I definitely would love to try.
LikeLike